10. Packet Forwarding
10.1. About Packet Forwarding
Packet Forwarding is a test suite of KVM4NFV. These latency tests measures the time taken by a
Packet generated by the traffic generator to travel from the originating device through the
network to the destination device. Packet Forwarding is implemented using test framework
implemented by OPNFV VSWITCHPERF project and an IXIA Traffic Generator.
10.2. Version Features
| Release | Features |
|---|---|
| Colorado |
|
| Danube |
|
| Euphrates |
|
10.3. VSPERF
VSPerf is an OPNFV testing project. VSPerf will develop a generic and architecture agnostic vSwitch testing framework and associated tests, that will serve as a basis for validating the suitability of different vSwitch implementations in a Telco NFV deployment environment. The output of this project will be utilized by the OPNFV Performance and Test group and its associated projects, as part of OPNFV Platform and VNF level testing and validation.
For complete VSPERF documentation go to link.
10.3.2. Supported Operating Systems
- CentOS 7
- Fedora 20
- Fedora 21
- Fedora 22
- RedHat 7.2
- Ubuntu 14.04
10.3.3. Supported vSwitches
The vSwitch must support Open Flow 1.3 or greater.
- OVS (built from source).
- OVS with DPDK (built from source).
10.3.4. Supported Hypervisors
- Qemu version 2.6.
10.3.5. Other Requirements
The test suite requires Python 3.3 and relies on a number of other packages. These need to be installed for the test suite to function.
Installation of required packages, preparation of Python 3 virtual environment and compilation of OVS, DPDK and QEMU is performed by script systems/build_base_machine.sh. It should be executed under user account, which will be used for vsperf execution.
Please Note: Password-less sudo access must be configured for given user before script is
executed.
Execution of installation script:
$ cd vswitchperf
$ cd systems
$ ./build_base_machine.sh
Script build_base_machine.sh will install all the vsperf dependencies in terms of system packages, Python 3.x and required Python modules. In case of CentOS 7 it will install Python 3.3 from an additional repository provided by Software Collections (a link). In case of RedHat 7 it will install Python 3.4 as an alternate installation in /usr/local/bin. Installation script will also use virtualenv to create a vsperf virtual environment, which is isolated from the default Python environment. This environment will reside in a directory called vsperfenv in $HOME.
You will need to activate the virtual environment every time you start a new shell session. Its activation is specific to your OS:
For running testcases VSPERF is installed on Intel pod1-node2 in which centos operating system is installed. Only VSPERF installion on Centos is discussed here. For installation steps on other operating systems please refer to here.
10.3.6. For CentOS 7
## Python 3 Packages
To avoid file permission errors and Python version issues, use virtualenv to create an isolated environment with Python3. The required Python 3 packages can be found in the requirements.txt file in the root of the test suite. They can be installed in your virtual environment like so:
scl enable python33 bash
# Create virtual environment
virtualenv vsperfenv
cd vsperfenv
source bin/activate
pip install -r requirements.txt
You need to activate the virtual environment every time you start a new shell session. To activate, simple run:
scl enable python33 bash
cd vsperfenv
source bin/activate
10.3.7. Working Behind a Proxy
If you’re behind a proxy, you’ll likely want to configure this before running any of the above. For example:
export http_proxy="http://<username>:<password>@<proxy>:<port>/";
export https_proxy="https://<username>:<password>@<proxy>:<port>/";
export ftp_proxy="ftp://<username>:<password>@<proxy>:<port>/";
export socks_proxy="socks://<username>:<password>@<proxy>:<port>/";
For other OS specific activation click this link:
http://artifacts.opnfv.org/vswitchperf/colorado/configguide/installation.html#other-requirements
10.4. Traffic-Generators
VSPERF supports many Traffic-generators. For configuring VSPERF to work with the available traffic generator go through this.
VSPERF supports the following traffic generators:
- Dummy (DEFAULT): Allows you to use your own external traffic generator.
- IXIA (IxNet and IxOS)
- Spirent TestCenter
- Xena Networks
- MoonGen
To see the list of traffic gens from the cli:
$ ./vsperf --list-trafficgens
This guide provides the details of how to install and configure the various traffic generators.
As KVM4NFV uses only IXIA traffic generator, it is discussed here. For complete documentation regarding traffic generators please follow this link.
10.5. IXIA Setup
10.5.1. Hardware Requirements
VSPERF requires the following hardware to run tests: IXIA traffic generator (IxNetwork), a machine that runs the IXIA client software and a CentOS Linux release 7.1.1503 (Core) host.
10.5.2. Installation
Follow the installation instructions to install.
10.5.3. On the CentOS 7 system
You need to install IxNetworkTclClient$(VER_NUM)Linux.bin.tgz.
10.5.4. On the IXIA client software system
- Find the IxNetwork TCL server app
- (start -> All Programs -> IXIA -> IxNetwork -> IxNetwork_$(VER_NUM) -> IxNetwork TCL Server)
- Right click on IxNetwork TCL Server, select properties
- Under shortcut tab in the Target dialogue box make sure there is the argument “-tclport xxxx”
where xxxx is your port number (take note of this port number you will need it for the 10_custom.conf file).
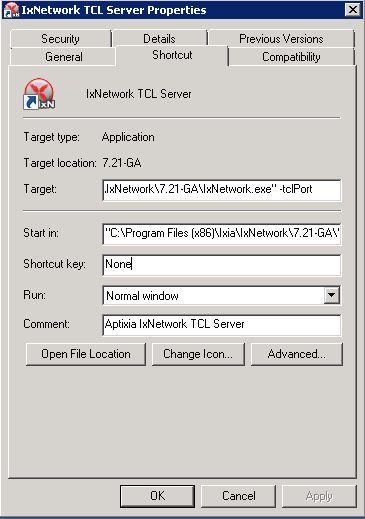
- Hit Ok and start the TCL server application
10.6. VSPERF configuration
There are several configuration options specific to the IxNetworks traffic generator from IXIA. It is essential to set them correctly, before the VSPERF is executed for the first time.
Detailed description of options follows:
- TRAFFICGEN_IXNET_MACHINE - IP address of server, where IxNetwork TCL Server is running
- TRAFFICGEN_IXNET_PORT - PORT, where IxNetwork TCL Server is accepting connections from TCL clients
- TRAFFICGEN_IXNET_USER - username, which will be used during communication with IxNetwork TCL Server and IXIA chassis
- TRAFFICGEN_IXIA_HOST - IP address of IXIA traffic generator chassis
- TRAFFICGEN_IXIA_CARD - identification of card with dedicated ports at IXIA chassis
- TRAFFICGEN_IXIA_PORT1 - identification of the first dedicated port at TRAFFICGEN_IXIA_CARD at IXIA chassis; VSPERF uses two separated ports for traffic generation. In case of unidirectional traffic, it is essential to correctly connect 1st IXIA port to the 1st NIC at DUT, i.e. to the first PCI handle from WHITELIST_NICS list. Otherwise traffic may not be able to pass through the vSwitch.
- TRAFFICGEN_IXIA_PORT2 - identification of the second dedicated port at TRAFFICGEN_IXIA_CARD at IXIA chassis; VSPERF uses two separated ports for traffic generation. In case of unidirectional traffic, it is essential to correctly connect 2nd IXIA port to the 2nd NIC at DUT, i.e. to the second PCI handle from WHITELIST_NICS list. Otherwise traffic may not be able to pass through the vSwitch.
- TRAFFICGEN_IXNET_LIB_PATH - path to the DUT specific installation of IxNetwork TCL API
- TRAFFICGEN_IXNET_TCL_SCRIPT - name of the TCL script, which VSPERF will use for communication with IXIA TCL server
- TRAFFICGEN_IXNET_TESTER_RESULT_DIR - folder accessible from IxNetwork TCL server, where test results are stored, e.g.
c:/ixia_results; see test-results-share- TRAFFICGEN_IXNET_DUT_RESULT_DIR - directory accessible from the DUT, where test results from IxNetwork TCL server are stored, e.g.
/mnt/ixia_results; see test-results-share
10.6.2. Cloning and building src dependencies
In order to run VSPERF, you will need to download DPDK and OVS. You can do this manually and build them in a preferred location, or you could use vswitchperf/src. The vswitchperf/src directory contains makefiles that will allow you to clone and build the libraries that VSPERF depends on, such as DPDK and OVS. To clone and build simply:
cd src
make
To delete a src subdirectory and its contents to allow you to re-clone simply use:
make cleanse
10.6.3. Configure the ./conf/10_custom.conf file
The supplied 10_custom.conf file must be modified, as it contains configuration items for which there are no reasonable default values.
The configuration items that can be added is not limited to the initial contents. Any configuration item mentioned in any .conf file in ./conf directory can be added and that item will be overridden by the custom configuration value.
10.6.4. Using a custom settings file
Alternatively a custom settings file can be passed to vsperf via the –conf-file argument.
./vsperf --conf-file <path_to_settings_py> ...
Note that configuration passed in via the environment (–load-env) or via another command line argument will override both the default and your custom configuration files. This “priority hierarchy” can be described like so (1 = max priority):
- Command line arguments
- Environment variables
- Configuration file(s)
10.6.5. vloop_vnf
VSPERF uses a VM image called vloop_vnf for looping traffic in the deployment scenarios involving VMs. The image can be downloaded from http://artifacts.opnfv.org/.
Please see the installation instructions for information on vloop-vnf images.
10.6.6. l2fwd Kernel Module
A Kernel Module that provides OSI Layer 2 Ipv4 termination or forwarding with support for Destination Network Address Translation (DNAT) for both the MAC and IP addresses. l2fwd can be found in <vswitchperf_dir>/src/l2fwd
10.6.7. Executing tests
Before running any tests make sure you have root permissions by adding the following line to /etc/sudoers:
username ALL=(ALL) NOPASSWD: ALL
username in the example above should be replaced with a real username.
To list the available tests:
./vsperf --list-tests
To run a group of tests, for example all tests with a name containing ‘RFC2544’:
./vsperf --conf-file=user_settings.py --tests="RFC2544"
To run all tests:
./vsperf --conf-file=user_settings.py
Some tests allow for configurable parameters, including test duration (in seconds) as well as packet sizes (in bytes).
./vsperf --conf-file user_settings.py
    --tests RFC2544Tput
    --test-param` "rfc2544_duration=10;packet_sizes=128"
For all available options, check out the help dialog:
./vsperf --help
10.7. Testcases
Available Tests in VSPERF are:
- phy2phy_tput
- phy2phy_forwarding
- back2back
- phy2phy_tput_mod_vlan
- phy2phy_cont
- pvp_cont
- pvvp_cont
- pvpv_cont
- phy2phy_scalability
- pvp_tput
- pvp_back2back
- pvvp_tput
- pvvp_back2back
- phy2phy_cpu_load
- phy2phy_mem_load
10.8. VSPERF modes of operation
VSPERF can be run in different modes. By default it will configure vSwitch, traffic generator and VNF. However it can be used just for configuration and execution of traffic generator. Another option is execution of all components except traffic generator itself.
Mode of operation is driven by configuration parameter -m or –mode
-m MODE, --mode MODE  vsperf mode of operation;
   Values:
        "normal" - execute vSwitch, VNF and traffic generator
        "trafficgen" - execute only traffic generator
        "trafficgen-off" - execute vSwitch and VNF
        "trafficgen-pause" - execute vSwitch and VNF but wait before traffic transmission
In case, that VSPERF is executed in “trafficgen” mode, then configuration
of traffic generator can be modified through TRAFFIC dictionary passed to the
--test-params option. It is not needed to specify all values of TRAFFIC
dictionary. It is sufficient to specify only values, which should be changed.
Detailed notes on TRAFFIC dictionary can be found at: ref:configuration-of-traffic-dictionary.
Example of execution of VSPERF in “trafficgen” mode:
$ ./vsperf -m trafficgen --trafficgen IxNet --conf-file vsperf.conf \
    --test-params "TRAFFIC={'traffic_type':'rfc2544_continuous','bidir':'False','framerate':60}"
10.9. Packet Forwarding Test Scenarios
KVM4NFV currently implements three scenarios as part of testing:
- Host Scenario
- Guest Scenario.
- SR-IOV Scenario.
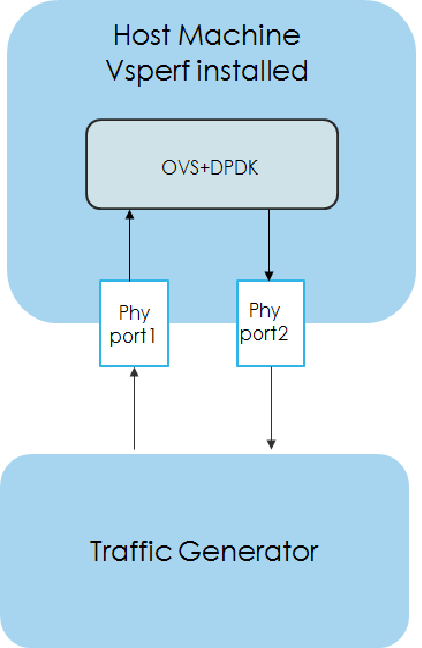
10.9.1. Packet Forwarding Host Scenario
Here host DUT has VSPERF installed in it and is properly configured to use IXIA Traffic-generator by providing IXIA CARD, PORTS and Lib paths along with IP. please refer to figure.2
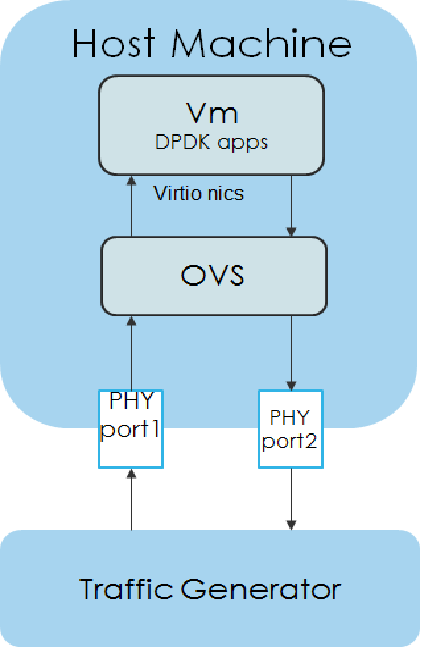
10.9.2. Packet Forwarding Guest Scenario (PXP Deployment)
Here the guest is a Virtual Machine (VM) launched by using vloop_vnf provided by vsperf project on host/DUT using Qemu. In this latency test the time taken by the frame/packet to travel from the originating device through network involving a guest to destination device is calculated. The resulting latency values will define the performance of installed kernel.
Every testcase uses one of the supported deployment scenarios to setup test environment. The controller responsible for a given scenario configures flows in the vswitch to route traffic among physical interfaces connected to the traffic generator and virtual machines. VSPERF supports several deployments including PXP deployment, which can setup various scenarios with multiple VMs.
These scenarios are realized by VswitchControllerPXP class, which can configure and execute given number of VMs in serial or parallel configurations. Every VM can be configured with just one or an even number of interfaces. In case that VM has more than 2 interfaces, then traffic is properly routed among pairs of interfaces.
Example of traffic routing for VM with 4 NICs in serial configuration:
         +------------------------------------------+
         |  VM with 4 NICs                          |
         |  +---------------+    +---------------+  |
         |  |  Application  |    |  Application  |  |
         |  +---------------+    +---------------+  |
         |      ^       |            ^       |      |
         |      |       v            |       v      |
         |  +---------------+    +---------------+  |
         |  | logical ports |    | logical ports |  |
         |  |   0       1   |    |   2       3   |  |
         +--+---------------+----+---------------+--+
                ^       :            ^       :
                |       |            |       |
                :       v            :       v
+-----------+---------------+----+---------------+----------+
| vSwitch   |   0       1   |    |   2       3   |          |
|           | logical ports |    | logical ports |          |
| previous  +---------------+    +---------------+   next   |
| VM or PHY     ^       |            ^       |     VM or PHY|
|   port   -----+       +------------+       +--->   port   |
+-----------------------------------------------------------+
It is also possible to define different number of interfaces for each VM to better simulate real scenarios.
The number of VMs involved in the test and the type of their connection is defined by deployment name as follows:
pvvp[number]- configures scenario with VMs connected in series with optionalnumberof VMs. In case thatnumberis not specified, then 2 VMs will be used.Example of 2 VMs in a serial configuration:
+----------------------+  +----------------------+
|   1st VM             |  |   2nd VM             |
|   +---------------+  |  |   +---------------+  |
|   |  Application  |  |  |   |  Application  |  |
|   +---------------+  |  |   +---------------+  |
|       ^       |      |  |       ^       |      |
|       |       v      |  |       |       v      |
|   +---------------+  |  |   +---------------+  |
|   | logical ports |  |  |   | logical ports |  |
|   |   0       1   |  |  |   |   0       1   |  |
+---+---------------+--+  +---+---------------+--+
        ^       :                 ^       :
        |       |                 |       |
        :       v                 :       v
+---+---------------+---------+---------------+--+
|   |   0       1   |         |   3       4   |  |
|   | logical ports | vSwitch | logical ports |  |
|   +---------------+         +---------------+  |
|       ^       |                 ^       |      |
|       |       +-----------------+       v      |
|   +----------------------------------------+   |
|   |              physical ports            |   |
|   |      0                         1       |   |
+---+----------------------------------------+---+
           ^                         :
           |                         |
           :                         v
+------------------------------------------------+
|                                                |
|                traffic generator               |
|                                                |
+------------------------------------------------+
pvpv[number]- configures scenario with VMs connected in parallel withoptional
numberof VMs. In case thatnumberis not specified, then 2 VMs will be used. Multistream feature is used to route traffic to particular VMs (or NIC pairs of every VM). It means, that VSPERF will enable multistream feaure and sets the number of streams to the number of VMs and their NIC pairs. Traffic will be dispatched based on Stream Type, i.e. by UDP port, IP address or MAC address.- Example of 2 VMs in a parallel configuration, where traffic is dispatched
based on the UDP port.
+----------------------+  +----------------------+
|   1st VM             |  |   2nd VM             |
|   +---------------+  |  |   +---------------+  |
|   |  Application  |  |  |   |  Application  |  |
|   +---------------+  |  |   +---------------+  |
|       ^       |      |  |       ^       |      |
|       |       v      |  |       |       v      |
|   +---------------+  |  |   +---------------+  |
|   | logical ports |  |  |   | logical ports |  |
|   |   0       1   |  |  |   |   0       1   |  |
+---+---------------+--+  +---+---------------+--+
        ^       :                 ^       :
        |       |                 |       |
        :       v                 :       v
+---+---------------+---------+---------------+--+
|   |   0       1   |         |   3       4   |  |
|   | logical ports | vSwitch | logical ports |  |
|   +---------------+         +---------------+  |
|      ^         |                 ^       :     |
|      |     ......................:       :     |
|  UDP | UDP :   |                         :     |
|  port| port:   +--------------------+    :     |
|   0  |  1  :                        |    :     |
|      |     :                        v    v     |
|   +----------------------------------------+   |
|   |              physical ports            |   |
|   |    0                               1   |   |
+---+----------------------------------------+---+
         ^                               :
         |                               |
         :                               v
+------------------------------------------------+
|                                                |
|                traffic generator               |
|                                                |
+------------------------------------------------+
PXP deployment is backward compatible with PVP deployment, where pvp is
an alias for pvvp1 and it executes just one VM.
The number of interfaces used by VMs is defined by configuration option
GUEST_NICS_NR. In case that more than one pair of interfaces is defined
for VM, then:
- for
pvvp(serial) scenario every NIC pair is connected in serial before connection to next VM is created- for
pvpv(parallel) scenario every NIC pair is directly connected to the physical ports and unique traffic stream is assigned to it
Examples:
- Deployment
pvvp10will start 10 VMs and connects them in series- Deployment
pvpv4will start 4 VMs and connects them in parallel- Deployment
pvpv1and GUEST_NICS_NR = [4] will start 1 VM with 4 interfaces and every NIC pair is directly connected to the physical ports- Deployment
pvvpand GUEST_NICS_NR = [2, 4] will start 2 VMs; 1st VM will have 2 interfaces and 2nd VM 4 interfaces. These interfaces will be connected in serial, i.e. traffic will flow as follows: PHY1 -> VM1_1 -> VM1_2 -> VM2_1 -> VM2_2 -> VM2_3 -> VM2_4 -> PHY2
Note: In case that only 1 or more than 2 NICs are configured for VM,
then testpmd should be used as forwarding application inside the VM.
As it is able to forward traffic between multiple VM NIC pairs.
Note: In case of linux_bridge, all NICs are connected to the same
bridge inside the VM.
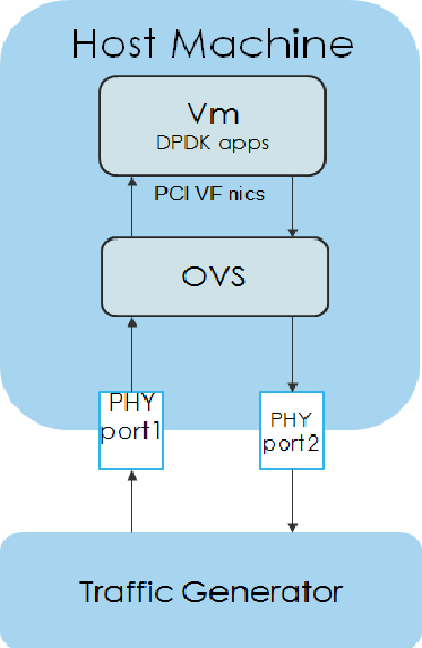
10.9.3. Packet Forwarding SRIOV Scenario
In this test the packet generated at the IXIA is forwarded to the Guest VM launched on Host by implementing SR-IOV interface at NIC level of host .i.e., DUT. The time taken by the packet to travel through the network to the destination the IXIA traffic-generator is calculated and published as a test result for this scenario.
SRIOV-support is given below, it details how to use SR-IOV.
10.9.4. Using vfio_pci with DPDK
To use vfio with DPDK instead of igb_uio add into your custom configuration file the following parameter:
PATHS['dpdk']['src']['modules'] = ['uio', 'vfio-pci']
NOTE: In case, that DPDK is installed from binary package, then please
setPATHS['dpdk']['bin']['modules']instead.
NOTE: Please ensure that Intel VT-d is enabled in BIOS.
NOTE: Please ensure your boot/grub parameters include the following:
iommu=pt intel_iommu=on
To check that IOMMU is enabled on your platform:
 $ dmesg | grep IOMMU
 [    0.000000] Intel-IOMMU: enabled
 [    0.139882] dmar: IOMMU 0: reg_base_addr fbffe000 ver 1:0 cap d2078c106f0466 ecap f020de
 [    0.139888] dmar: IOMMU 1: reg_base_addr ebffc000 ver 1:0 cap d2078c106f0466 ecap f020de
 [    0.139893] IOAPIC id 2 under DRHD base  0xfbffe000 IOMMU 0
 [    0.139894] IOAPIC id 0 under DRHD base  0xebffc000 IOMMU 1
 [    0.139895] IOAPIC id 1 under DRHD base  0xebffc000 IOMMU 1
 [    3.335744] IOMMU: dmar0 using Queued invalidation
 [    3.335746] IOMMU: dmar1 using Queued invalidation
....
10.9.5. Using SRIOV support
To use virtual functions of NIC with SRIOV support, use extended form of NIC PCI slot definition:
WHITELIST_NICS = ['0000:03:00.0|vf0', '0000:03:00.1|vf3']
Where vf is an indication of virtual function usage and following
number defines a VF to be used. In case that VF usage is detected,
then vswitchperf will enable SRIOV support for given card and it will
detect PCI slot numbers of selected VFs.
So in example above, one VF will be configured for NIC ‘0000:05:00.0’ and four VFs will be configured for NIC ‘0000:05:00.1’. Vswitchperf will detect PCI addresses of selected VFs and it will use them during test execution.
At the end of vswitchperf execution, SRIOV support will be disabled.
SRIOV support is generic and it can be used in different testing scenarios. For example:
- vSwitch tests with DPDK or without DPDK support to verify impact of VF usage on vSwitch performance
- tests without vSwitch, where traffic is forwared directly between VF interfaces by packet forwarder (e.g. testpmd application)
- tests without vSwitch, where VM accesses VF interfaces directly by PCI-passthrough to measure raw VM throughput performance.
10.9.5.1. Using QEMU with PCI passthrough support
Raw virtual machine throughput performance can be measured by execution of PVP test with direct access to NICs by PCI passthrough. To execute VM with direct access to PCI devices, enable vfio-pci. In order to use virtual functions, SRIOV-support must be enabled.
Execution of test with PCI passthrough with vswitch disabled:
$ ./vsperf --conf-file=<path_to_custom_conf>/10_custom.conf \
           --vswitch none --vnf QemuPciPassthrough pvp_tput
Any of supported guest-loopback-application can be used inside VM with PCI passthrough support.
Note: Qemu with PCI passthrough support can be used only with PVP test deployment.
10.9.5.2. Guest Core and Thread Binding
VSPERF provides options to achieve better performance by guest core binding and guest vCPU thread binding as well. Core binding is to bind all the qemu threads. Thread binding is to bind the house keeping threads to some CPU and vCPU thread to some other CPU, this helps to reduce the noise from qemu house keeping threads.
GUEST_CORE_BINDING = [('#EVAL(6+2*#VMINDEX)', '#EVAL(7+2*#VMINDEX)')]
NOTE By default the GUEST_THREAD_BINDING will be none, which means same as the GUEST_CORE_BINDING, i.e. the vcpu threads are sharing the physical CPUs with the house keeping threads. Better performance using vCPU thread binding can be achieved by enabling affinity in the custom configuration file.
For example, if an environment requires 28,29 to be core binded and 30,31 for guest thread binding to achieve better performance.
VNF_AFFINITIZATION_ON = True
GUEST_CORE_BINDING = [('28','29')]
GUEST_THREAD_BINDING = [('30', '31')]
10.9.5.3. Qemu CPU features
QEMU default to a compatible subset of performance enhancing cpu features. To pass all available host processor features to the guest.
GUEST_CPU_OPTIONS = ['host,migratable=off']
NOTE To enhance the performance, cpu features tsc deadline timer for guest, the guest PMU, the invariant TSC can be provided in the custom configuration file.
10.9.5.4. Selection of loopback application for tests with VMs
To select the loopback applications which will forward packets inside VMs, the following parameter should be configured:
GUEST_LOOPBACK = ['testpmd']
or use --test-params CLI argument:
$ ./vsperf --conf-file=<path_to_custom_conf>/10_custom.conf \
      --test-params "GUEST_LOOPBACK=['testpmd']"
Supported loopback applications are:
'testpmd'       - testpmd from dpdk will be built and used
'l2fwd'         - l2fwd module provided by Huawei will be built and used
'linux_bridge'  - linux bridge will be configured
'buildin'       - nothing will be configured by vsperf; VM image must
                  ensure traffic forwarding between its interfaces
Guest loopback application must be configured, otherwise traffic will not be forwarded by VM and testcases with VM related deployments will fail. Guest loopback application is set to ‘testpmd’ by default.
NOTE: In case that only 1 or more than 2 NICs are configured for VM, then ‘testpmd’ should be used. As it is able to forward traffic between multiple VM NIC pairs.
NOTE: In case of linux_bridge, all guest NICs are connected to the same bridge inside the guest.
10.9.6. Results
The results for the packet forwarding test cases are uploaded to artifacts and also published on Yardstick Grafana dashboard. The links for the same can be found below
http://artifacts.opnfv.org/kvmfornfv.html
http://testresults.opnfv.org/KVMFORNFV-Packet-Forwarding